Wednesday, September 28, 2016

New pattern: Folia Triangle

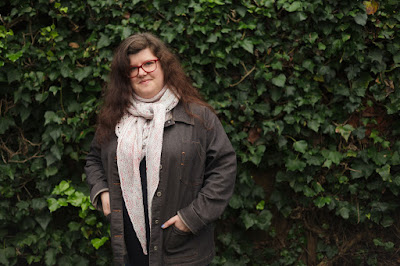
And that's a wrap! Rounding out my La Folia Collection is Folia Triangle, now available on Ravelry. It's a bottom-up triangular shawl with two size options - I knit the large size, and it's enormous and very snuggly. :)


Features:
  • a v-shaped leaf-lace panel on a background of garter stitch
  • a shallow triangular shape, knit from the bottom point upwards
  • a tidy i-cord bind off
  • stitch markers keep track of the lace section's boundaries, so that only a few rows require you to pay special attention
  • for two skeins of fingering-weight yarn, or one high-yardage skein
  • perfect for speckled or lightly variegated yarn as well as solids and semi-solids - the lace pattern is simple enough to take it
  • two sizes (shown in L), easily shrunk or enlarged by changing the number of repeats
  • pattern includes full written instructions and hybrid charted + written instructions

I used two gorgeous skeins of Revelry Sock from Circus Tonic Handmade, in a speckled colourway called 'Zebra Finch'. All of Circus Tonic's colours are named after Australian birds, which I think is really cool (as a fellow bird lover).

You can see all the details and download the Folia Triangle pattern via Ravelry, Loveknitting, Etsy, or Craftsy. An ebook with all three patterns is also available on Ravelry as the La Folia Collection.


--------------------------------------------------------------------------------------------

P.S. Here's a tiny video I posted on Instagram a couple of months ago, when I was knitting the bind off on this shawl:

Friday, September 23, 2016

Ombré crochet: How to make a gradient square

I've started a new 'relaxation project'! I really like having something uncomplicated to work on when I want to pay attention to conversations/tv or when I'm tired - I'm all for multiple works-in-progress with a variety of techniques and difficulty levels.

I'm making another crochet blanket, this time made up of squares which I'll seam together later. In each square, the colours will radiate from dark-to-light or light-to-dark, alternating like a chessboard.


My inspiration is a delicate granny square blanket featured in Jared Flood's blog post about the Icelandic Textile Museum. I tried out a few different kinds of squares, and decided to go for super-simple solid crocheted squares rather than classic granny squares.

The small square I made as a swatch (with only one round per shade) is the perfect size for a coaster. :)


I've had some undyed corriedale wool from the Little Wool Company in my stash for a couple of years, which I'd intended for a cardigan but couldn't get gauge for the pattern I had my eye on (as this is quite a thin 4ply). I think a blanket like this will really let the natural sheepy colours shine! I have 200g cones of natural white, oatmeal, and silver. The yarn will be held double, with two crocheted rounds per colour or colour blend.


Here are all the details, if you'd like to make your own gradient squares...

Materials: 
  • 4ply yarn in three colours, about 31g or 140yds total per square. I'm aiming for a 5x7 blanket (about 40"/102cm x 56"/142cm), so I will need about 1200g or 5,472yds of yarn which should include enough for seaming and adding a border. Holding it doubled definitely eats yarn!
  • a 4mm crochet hook (or size that makes a fabric you like).
  • a needle for weaving in ends.
  • a blocking board (optional).

Tips: 
  • If I'm using a wool yarn, I like to crochet over the yarn ends as I go to reduce weaving-in later.
  • It's nice and easy to spit-splice 4ply wool, especially non-superwash. I do tend to dip my finger in my water glass (or tea cup or wine glass) rather than spit, however - I'm prissy like that. :p
  • After I finish each square I wash it, squeeze out the water, and stretch it out on my homemade blocking board: four nails in a piece of scrap wood, with 8 1/2 inches between nails as you go round the square. The corner-holes of the crocheted square go over the nails (see photo below).

Abbreviations (in US crochet terms):
  • ch = chain
  • dc = double crochet
  • sc = single crochet
  • st = stitch
    Note: If you're more familiar with UK crochet terms, there's a handy translation chart here. The relevant terms for this project are US dc = UK tr, and US sc = UK dc.

    - - - - - - - - - - - - - - - - - - - - - - - - - - - - - - - - - - - - - - - - - - - - - - - - - - - - - - - -

    How to make a square (about 8"/20cm wide): 

    With colour A held double, make a magic ring OR ch 5 and join with a slip stitch.

    Round 1: Ch 2, 3 dc into ring, *ch 3, 4 dc into ring, repeat from * twice more, ch 3, join to top of initial ch 2 with a slip stitch.

    Round 2: Ch 2, 1 dc into each of the next 2 sts, *(2 dc, ch 3, 2 dc) into corner space, 1 dc into each of the next 3 sts, repeat from * twice more, (2 dc, ch 3, 2 dc) into corner space, join to top of initial ch 2 with a slip stitch.

    Break yarn and fasten off. With colour A and colour B held together, join yarn to any side of the square.
    Rounds 3-4: Ch 2, *1 dc into each st until you reach the next corner space, (2 dc, ch 3, 2 dc) into corner space, repeat from * three more times, 1 dc into each st until you reach the initial ch 2, join to top with a slip stitch.

    Break yarn and fasten off. With colour B held double, join yarn to any side of the square.
    Rounds 5-6: Work as established in Rounds 3-4.

    Break yarn and fasten off. With colour B and colour C held together, join yarn to any side of the square.
    Rounds 7-8: Work as established in Rounds 3-4.

    Break yarn and fasten off. With colour C held double, join yarn to any side of the square.
    Rounds 9-10: Work as established in Rounds 3-4.

    Round 11: Ch 1, *1 sc into each st until you reach the next corner space, 4 sc into corner space, repeat from * three more times, 1 sc into each st until you reach the initial ch 1, join to top with a slip stitch.

    Break yarn and fasten off. Weave in any remaining ends, and wet block the square.


    When the time comes, I'll write a post about seaming the squares together and adding a border. I think picot stitches around the edge could look really pretty - but I'm getting ahead of myself now. 2 squares down, 33 to go...

    Thursday, September 15, 2016

    New pattern: Folia Loop

    Folia Loop is the second design in my La Folia Collection of accessories featuring leafy lace and garter stitch. It's a lightweight cowl that can be worn draped as a long loop or doubled up for warmth. I was lucky enough to have my Mum agree to model it for me!


    It requires only one skein of fingering-weight yarn - I used Malabrigo Mechita in 'Pearl', a soft grey with a pretty tinge of mauve. It's a little more tricky than the Folia Crescent shawl, but aside from the provisional cast on and the final grafting it should be relatively intuitive once you've knit the first section or two of the lace. And the garter section is of course smooth sailing!

    If you haven't tried a provisional cast on before or would like to try a new method, this is my favourite tutorial, using the crochet hook method: Crochet Provisional Cast On.


    Features:
    • a diagonal leafy lace panel surrounded by squishy garter stitch
    • long enough to wear looped either once or twice
    • knit flat with a provisional cast on and grafted to finish
    • a stitch marker keeps track of the lace/garter boundary
    • a one skein project in fingering-weight yarn, perfect for that precious single skein
    • one size, easily enlarged by working extra garter stitch rows
    • pattern includes full written instructions and hybrid charted + written instructions

    You can see all the details and download the Folia Loop pattern via Ravelry, Loveknitting, Etsy, or Craftsy.

    The remaining pattern in the collection, a triangular shawl, is currently being test knit and will be released in late September. You can find the collection-so-far here on Ravelry: La Folia Collection. The triangular shawl pattern will be added to the ebook once it's released.

    Curious about the name La Folia? I introduced the collection and its musical inspiration in my earlier post, New pattern: Folia Crescent.

    Monday, September 12, 2016

    A tale of two sweaters

    You guys, I finished a sweater... and it only took me two-and-a-bit weeks! For me, that is FAST. It was my big Ravellenics project, so I was determined to get it done before the deadline. I put my other works-in-progress aside for the two weeks and just worked on this whenever I could. Result: a new knitted garment that didn't take me several months. ;)


    The pattern is Ysolda's Blank Canvas, and I used less than five skeins of Longrider DK from Madelinetosh in the 'River Water' colourway. I'm still completely in love with the speckles!

    One thing I would do differently next time is to knit the sleeves on similar needles to the ones I used for the body: I used wooden double pointed needles on the lower part of the sleeves and slippery metal needles on the body, and the gauge is visibly looser on the sleeves. Ooops. 

    I've been wearing it regularly for a few weeks now, and so far the only signs of wear are a few pills under the arms. I still need to block it, but I'm waiting for warmer weather so I won't be without it for long while it dries. <3


    To keep my garment-knitting momentum going, I dug out an old half-finished WIP from 2014 and decreed it my new Weekend Knitting project. The pattern is Laura Aylor's Park Slope tee, and the yarn is Vintage Purls Sock in 'Across the Universe', with subtle swirls of midnight purple and blue.

    I've nearly finished the ribbing at the hem, and then I'll just have the sleeve ribbing and neckline ribbing to go. And then I'll have another new top to wear, just in time for spring.