Showing posts with label fashion baby. Show all posts

Thursday, May 4, 2017

Knitted treasure

Have you been following the Yarn Love Challenge on Instagram? I've been doing my best to keep up with the prompts for the last couple of months, and it's been great for sparking ideas for my daily photos and also discovering other yarn-loving people through the hashtag.

The challenge prompt for April 30th was "made for me", which gave me the idea of showing off an amazing sweater which my Mum made for me, almost 30 years ago...


That's me and my brother feeding the chooks!

I'm a big fan of the harmonious colour palette, with its brights toned down with greys and pastels. Isn't it beautiful?


The pattern is 'Outlined Star' from Kaffe Fassett's 1985 book Glorious Knitting. It's one of the gems from Mum's collection of retro knitting books which we get out now and then to marvel over. Some of the 80s books are more valuable as comedy than inspiration right now, but Glorious Knitting still stands up in my opinion! I love the photography and colours, and I'm in awe of some of the designs. If you're keen for some top-notch colourwork inspiration, you might be able to find it at your local library or second-hand bookshop. 


There are certain knitting techniques that are generally considered difficult or advanced at the moment, that weren't so much when I was growing up. This sweater incorporates two of them: stranded colourwork knit flat, and 3-colour stranding. And because Mum was comfortable with these techniques, I didn't shy away from them when I first learned to knit. Thanks Mum!

My first attempt at colourwork of any kind was an Inga Hat, which I tried to adapt for flat knitting, but got horribly confused by the braid at the brim. Later, when I'd learned to knit in the round, my first completed colourwork project was an Opus Spicatum hat in a full rainbow of colours instead of the original two - which resulted in working 3-colour (and even a few 4-colour) rounds. It was a massive challenge, but I managed to finish it with the help of online tutorials and sheer bloody-mindedness. Hooray for adventurous newbies! ;)

Thursday, May 19, 2016

Finished project: Royally Striped

You guys, I actually finished a garment! This only happens once or twice a year, I am sloooow when it comes to garment knitting - mostly because I have so many other things I want to knit, and if they're my own designs I prioritise them. Which is totally great! But I think I need to get back to doing purely ME-knitting on the weekends, because I'd love a couple more jerseys and cardies in my wardrobe.

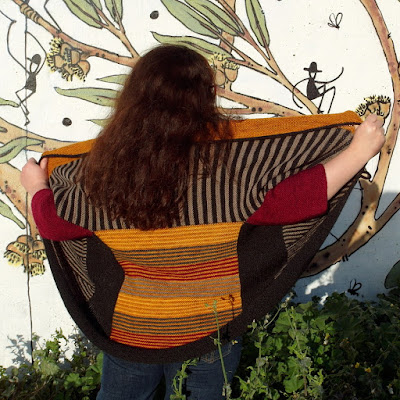
This is my Royally Striped cardie, designed by Stephen West and knit in a combo of Morris and Sons Norway 8ply (the natural charcoal and brown colours) and Vintage Purls Max (the burgundy and golds). The golds are actually the leftovers from my Beeswax Set, now put to good use. :)


Isn't this mural neat? It's across the train tracks from our place, on the side of some storage units. I like the little people climbing around in the eucalyptus branches.

Royally Striped is an all-in-one-piece design, where you knit one section and then pick up stitches for the next section. It's quite magical, the way it grows and grows. I really like the i-cord bind off around all of the edges, it finishes it off really tidily. I did add a big wooden button, but I prefer the way it looks unbuttoned.

The striped short-row wedges were fun to knit - don't they look cool?


Here's a closer look at the back, with its block of colourful narrow stripes:


I do love the cuddliness of garter stitch!


Next up will be another one of these. Not as exciting (especially as I've knit one before), but it will be a great basic super-wearable jersey. And my yarn is speckled, so scratch that - it IS exciting!

Wednesday, January 20, 2016

Craft holiday II

My post-Christmas break in NZ is nearly over, so it must be time to show off all the things I made! Like my previous craft holiday, I took full advantage of having access to Mum's sewing machine. This time I made tops using downloadable indie patterns. I haven't had much experience sewing from patterns (as opposed to following photo tutorials on blogs or just figuring things out myself) - so I learned a lot along the way. :)


I started off making a Wiksten top out of some lightweight cotton fabric with a diagonal tie-dye stripe. I enlarged the pattern one extra size, which worked well - hooray for drawing skills! The fit is pretty good, certainly good enough for a casual top.

I dove into making a second one, this time using a crystal-print cotton sateen fabric from Spoonflower and plain white bias binding. Mum thought the fabric was far too heavy for a Wiksten top, and (surprise, surprise) she was totally right - it didn't drape well, so the not-quite-right fit around the armholes was very obvious. She fixed the problem by demonstrating how to put in some small darts above the bust line - thanks Mum!

I moved on to another pattern for my next sewing adventure, a Fen top in a black linen-cotton blend. Instead of following the pattern's instructions I kind of did my own thing while sewing it up. This worked out very well with the bias binding around the neckline (which is super tidy if I do say so myself):


However, I messed up with the seams - I decided to do French seams again, but didn't realise it would cause problems with the curved underarm seams. Luckily the fabric looks the same on both sides, so I just decided to turn the top inside-out and continue. It's not a mistake, I declare, it's a design decision to have my French seams on the outside. ;)

Again, my fabric was a bit too heavy for the pattern, but I think it looks ok this time. It's certainly a very comfortable, roomy top. I'll be looking out for lighter, drapier fabrics to make more Fen tops the next time I do some sewing.


Learnings:
  • using proper patterns isn't hard or scary
  • I can enlarge a pattern if necessary by looking at the outlines of the other sizes and just drawing one size further 
  • bias binding isn't hard to get nice and tidy (if you use the iron a lot)
  • fabric choice is IMPORTANT - pay attention to the pattern's fabric suggestions, and Mum's warnings
  • French seams are awesome, but not for curved underarm seams
  • linen / linen blends are easy to work with
  • bust darts are my friends 

--------------------------------------------------------------------------------------------

I've also been knitting away on a new scarf design which I plan to release in the next week or two, once it's all photographed and polished up. Here's a peek at the scarf-in-progress...

Thursday, November 12, 2015

Craft holiday

My stay in Whakatane is drawing to an end, and on Saturday I'll be flying back to Melbourne. As always, I've done a lot of crafting while hanging out with Mum & Dad, sitting in my favourite knitting spot in the sun-room or bent over the sewing machine.

As part of my getting-ready-for-summer project, I sewed a couple of lightweight cotton skirts. I used the Purl Bee's tutorial Gathered Skirt for All Ages, and adapted it for a longer length and no pockets. My skirts are super comfy to wear, and were quite straightforward to make for a semi-beginner like me. Each one took me two days of tinkering. :)


I also want to finish sewing my ill-fated silk cowl, which will hopefully work out this time around! 

Last week I finished knitting a hat-and-mitts set, tweaked their patterns, and had a photoshoot with Dad behind the camera (which is always fun). I'm planning to release the patterns in December, so I don't want to give too much away just yet. Here's a tiny peek...


Finally, here are a few photos from Mum and Dad's garden. Yesterday I played around with Dad's smaller camera - it's never hard to find interesting things to photograph in a garden...

A rose called 'Greensleeves'

A fern frond unfurling

Plenty of thyme

Tuesday, October 27, 2015

Bird Sanctuary + Slow Fashion IV

This is another belated Slow Fashion October post, as my weekend was full up with visiting a bird sanctuary, working on a new hat design, choir, brunch, and other pleasant-but-tiring things.

The Serendip Sanctuary was amazing, by the way - very chilled out and quiet (except for the birds), so we were able to take our time wandering around and noticing the more camouflaged wildlife. A lengthy discussion occurred over whether a particular brown shape was a bird, lizard, or stick. It turned out to be a napping tawny frogmouth!

Wetland with birds (click to enlarge, and spot the emus in the distance!)

A tawny frogmouth staring us down

Slow Fashion October prompt:
Week 4, October 19-25: WORN
second-hand / mending / caring for things / laundering for longevity / design for longevity (bucking trends, quality materials …) / heirlooms

This one's very timely for me, as I've been getting my outfit ready for my brother's wedding this Saturday (yay Jeff!). As usual, I'll be wearing several second-hand pieces - my blouse, jacket, shoes, and jewellery.

I have a glass-bead necklace which I inherited from my Nana, which I've worn on fancy-dress-up occasions before, like choir concerts. It's always been a little too short for me, and the clasp was quite tarnished, so I decided to re-string it for this occasion.

Before

After

I struggled a bit with knotting the silk thread and securing the ends tidily, but the clasp will be hidden by my hair anyway so I think it's fine.

I also have more mending to do today, if I have time - I'd like to replace the buttons on a black silk shirt so I can wear it to dinner on Friday. We'll be staying at a posh Art Deco hotel in Napier, which I'm looking forward to!

I'll be staying on after the wedding festivities, relaxing at Mum & Dad's and doing lots of sewing and knitting. Can't wait. :)

Monday, October 19, 2015

Slow Fashion III

This week's prompt:
Week 3, October 12-18: LOVED
proudest accomplishment / most loved item / most frequently worn item / thing you saved up for / investment pieces / thing you worked a long time on / oldest thing that’s still in rotation

My most frequently worn hand-knit garment is definitely my Blank Canvas jersey. I knit it back in 2013, and in winter I wear it a few times a week.
It's very soft and comforting (the yarn is a DK-weight cashmere from Colourmart), and the three-quarter sleeves are very practical since I'm generally doing stuff with my hands all day. Its simple design and plain dark brown colour make it a perfect wardrobe staple.

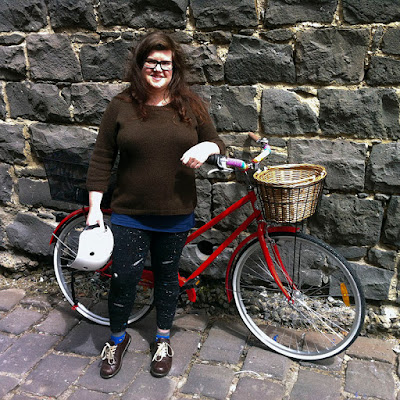
Me, my jersey, and my ride (October 2013)


In fact, I'm so happy with this jersey that I'm planning to knit the same pattern again! This time I'll use a 'busier' yarn, since this pattern can take it.

I ordered five skeins of Longrider DK in 'River Water' from Madelinetosh's recent sale, and the parcel arrived this morning (to much excitement). This yarn is a squishy, soft merino with 25% nylon for durability. I want this jersey to last a long time!

Don't you just love the speckles? 


Monday, October 12, 2015

Birthday Sale + Slow Fashion II

I'm having a pattern sale in my Ravelry store! On October 13th, all of my individual self-published patterns will be 20% off. Just use the code BDAYSALE20 at the Ravelry checkout.


I'm not sure yet how we'll be celebrating, but I'm leaning towards fish and chips at the beach. :)

--------------------------------------------------------------------------------------------

Now on to Slow Fashion October... this week I've been focusing on the 'handmade' part of the prompt:
Week 2, October 5-11: SMALL
handmade / living with less / quality over quantity / capsule wardrobe / indie fashion / small-batch makers / sustainability

I desperately need more lightweight, breezy summer tops, preferably sleeveless or with very short sleeves. Tshirts just don't cut it for an Australian summer! I also want to sew at least one long lightweight skirt with an elastic waist for maximum comfort.

I've been doing lots of research, and even ordering some supplies. I've gotten as far as ordering some fabric, and I've found a few indie patterns for the kinds of tops I want to wear: simple, fuss-free, and beginner-level (especially as I haven't sewn from patterns before). I'm most excited about Sew DIY's Lou Box Top, which includes different options for the neckline and hem. I also ordered a copy of Alabama Studio Sewing Patterns, which looks amazing.

I'm also hoping to replicate my home-made dinosaur top in a lighter fabric. I sewed the original three years ago and I still wear it regularly! It's held up to wear and washing a lot better than my shop-bought tshirts, which usually end up out-of-shape and shabby after a year or two - hooray for handmade. :)

Dino top + crochet-in-progress (Feb 2014)

Tuesday, October 6, 2015

Slow Fashion I

I'm a little late with this post, but here it is - my intro post for Slow Fashion October! The month has barely started, and there are already a lot of great conversations happening in the knitting/sewing/crafting world. Bristol Ivy's Instagram post (plus its comments) on affordable, inclusive slow fashion is a thought-provoking example.

 And so, on to this week's prompt:
“Week” 1,  October 1-4: YOU
First let’s introduce ourselves: Where are you at with all this / What first got you interested in Slow Fashion / What are your skills / What do you hope to get out of Slow Fashion October / What are your personal goals for the month / Do you have a special project you plan to tackle this month?

I've been doing slow fashion for a long time. A fair proportion of my clothes and shoes are second-hand, and a few things are home-made by me. I struggle to find well-made natural-fibre clothes that are affordable, but I tend to have better luck in second-hand shops than elsewhere. I also have an odd-shaped body (with my sway back and total lack of hips), so making/altering my own clothes is often necessary for getting a good fit.

Of course, sewing and op-shop hunting can take a lot of time (that's the 'slow' part), and it can get frustrating if I can't find a very particular item which I need, and don't have the skills to make it.

My slow fashion skills are knitting (very confident), sewing (trial-and-error style), crochet (moderately confident), and spinning and dyeing (beginner-ish). This month I hope to make progress with a few projects, learn more about sustainable fabric dyeing, and get lots of ideas and inspiration from other participants. These are my plans...

Knitting

I'm trying to make more time to knit garments for myself, as I have a lot of must-make items in my queue. Lately I've been setting aside weekends as no-work-knitting time, which has been really refreshing. It's nice to knit from other people's patterns again! I've made lots of progress on my Royally Striped cardie, and I now have just the borders to go.

Here's a progress pic (not modelled, as it's 35 degrees and I am not putting on a woolly cardie):

Clockwise from top left: the lower back, the upper back, a sleeve, and a side.

Dyeing

Now that I have my own copy of Eco Colour, India Flint's amazing book on sustainable natural dyeing, I plan to embark on some more dyeing experiments. I've ordered a trio of lightweight ethically-produced wraps from Beautiful Silks - an unbleached linen wrap (to use as a sarong/scarf), an Australian merino wrap (for cooler weather), and a linen/silk blend scarf.

Sewing

I also have plans to sew a few simple summer clothes when I'm in Whakatane next month and can use Mum's sewing machine. I'm thinking a long, light skirt and a breezy top or two, as I really need some more warm-weather options. The sewing part will be in November, but I'll do some planning and fabric buying in advance.

That's all for now! If you use Instagram, do check out the #slowfashionoctober posts. <3

Monday, June 22, 2015

A shawl, a scarf, and some stripes

Would you like a peek at what I've been working on recently? As usual I have a few knitting projects on the needles, as well as assorted swatches for trying out new ideas.

I have a bit of an obsession with speckled yarn at the moment. This shawl is a new design, in speckle-dyed BFL Sock yarn from Skein - the colour is called 'Neon + Grey'. I've finished the knitting, but haven't blocked it yet as I'm quite enjoying the unblocked texture:

These ribs will turn into lace when blocked

The edging, with alternating texture 'stripes'

The wrong side looks pretty mad. :)

This silvery scarf is another design in progress, in Outlaw Yarn's Bohemia Worsted - it's a pleasure to knit with something so soft! I'm about halfway through this one...

Texture and softness

And this is the beginning of a cardie I'm making for myself, in various 8ply yarns including Morris Norway 8ply in natural shades and Vintage Purls Max in shades of gold and burgundy. The pattern is Stephen West's Royally Striped. It should be super cosy! Hopefully I can finish it before spring.

Short rows and stripes

What are you working on at the moment?

Tuesday, March 3, 2015

Henna appreciation

Willie helped me dye my hair with henna a couple of weeks ago, and I'm still admiring its redness every time I pass a mirror. ;)

Evening light = maximum glow!

The best instructions I've found are in the free 'How To' ebook by Catherine Cartwright-Jones. She's included lots of info on what henna is, its history, and how it works. She stresses the importance of using pure, body-art quality henna powder rather than buying a pre-mixed product (which can contain dodgy ingredients). I order my powder online.

We've refined our method over the years, to make the henna mixture easier to apply to my ridiculously thick hair. If you're interested in trying henna on your own hair, here are my tips (but do read the ebook for the full picture):
  • 100g of henna powder is plenty for shoulder-length hair if the mixture is fairly runny (with a consistency like crepe batter). We found this consistency easier to apply, although it does drip a bit during the waiting period.
  • Bottled lemon or lime juice works well for the mixture, diluted with water for a runny mix as above. Non-pulpy orange juice works well too (one with apple base is fine).
  • If the mixture is lumpy, you can smooth it out using electric beaters. 
  • Let the mixture rest overnight.
  • Before the application, spread old towels on the chair and surrounding floor. 
  • Have a willing assistant apply the mixture to your hair!
  • Important: start at the front of the head and work backwards (we found this much easier).
  • Use ‘crocodile clips’ to manage hair sections.
  • After application, use a damp soapy flannel to wipe henna off your face, neck, and ears.
  • Ensure the weight of your henna-coated hair is centred on the top of your head before covering it with plastic wrap and/or a shower cap.
  • Leave the mixture on for 2-4 hours, or until you've had enough.
  • Beware of drips! Wear an old towel around your shoulders and use the ends to wipe up any drips down your face/neck.

I only made it to three hours before washing out the henna last time, as the drips were getting on my nerves. The runnier consistency and shorter waiting-time don't seem to have made a difference to the result.

I hope some of this is helpful! I get around to henna-ing my hair about twice a year, and it's always well worth it. I love the way it works with the lighter and darker tones in my hair, adding a rich glow. My small collection of white hairs also take the dye well, turning brighter red than the rest. :)

Thursday, July 10, 2014

Mending

One benefit of being a crafter is that when something made of yarn or fabric needs mending, chances are you'll know at least one way to tackle it.
For example, because I have basic hand-sewing skills, I'm able to replace buttons, sew a hem, patch jeans, and fix small holes in knitwear. I do all this by trial-and-error, and not terribly tidily! My hand-sewing skills are still a bit rough. ;)

I would, however, like to learn a proper darning technique for when my precious hand-knitted things need repairs. I've been into knitting socks lately, so holes are only a matter of time...

Last year I repaired a second-hand jersey which had a hole in one sleeve cuff, and a couple of ragged bits at the edge of the other cuff and the bottom of the hem. I used laceweight yarn from my leftovers stash, and a small crochet hook to do the repairs. I crocheted around the hole on the cuff with grey yarn, and then filled in the hole (crochet is great for free-styling). I dealt with the 'bites' on the edges by crocheting over them with a contrasting golden yarn. I went right round the cuffs and hem to make it look more deliberate:

Sleeve 1

Sleeve 2

The hem

This afternoon I decided to finally repair my old pair of possum/merino gloves, which had a couple of tiny holes from wear and tear. They're good basic gloves, and I'd stopped wearing them to prevent the damage getting worse, so I'm glad to have them back. :)

Again, I crocheted around the holes first, and then decreased in a spiral. I managed to do a much tidier job this time, partly because the holes were small. I then decorated the repaired-bits with duplicate stitch.

Glove 1, with repair to palm

(and decorated)

Glove 2, with repair at base of thumb.

The decorations were inspired by the 'visible mending' aesthetic of knitter and darning-teacher Tom of Holland. He uses a multitude of patterns and contrasting colours to repair knitwear, which I think is really neat. You can see some of his work on his blog.

Saturday, June 1, 2013

Bra shopping success!

It's been a while since I wrote about my search for a properly-fitting bra. I got sidetracked by other things, and then I failed to check Brava's opening hours and ended up pouting outside a closed shop (note to self: don't assume specialist shops are open on Sundays). But today we gathered our gumption and headed back to their Collins St shop.

I asked for a fitting, and the assistant asked what I was looking for and what size I've been wearing. I explained that I wanted a plain, everyday, more-or-less-skin-coloured bra, and that I've been wearing 16D (because it was the best I'd found), but that I thought I needed more like a 14F. She agreed that that would be a good size to start trying, and so the changing-room saga began...

I found it much less frustrating than my past bra-shopping experiences: they had my size in all of their styles, and the assistant fetched things for me to try as we narrowed down what I needed - no rummaging through the racks myself, getting discouraged. Her timing was spot-on, so I wasn't left waiting for the next option, or feeling rushed either. I ended up with three good 'maybes' that we agreed fit me well, all beige and lace-free and 14F. I settled on the most comfortable of the three, plus a basic sports bra in black. The beige one will be ideal for being unobtrusive under tshirts etc, and the sports bra will be fine when I'm wearing more layers. If sports bras had a smoother shape they'd be perfect, but alas, protruding seams are apparently the price you pay for proper scaffolding!

The only slightly frustrating part of the process was that there were plenty of pretty, lacy, colourful, feminine bras in the shop (which are just not 'me'), but not many plain, basic styles. Even the plainest still had small bows on them. 

"No lace. No lace, Mrs. Bennet, I beg you!" (P&P 1995, Ep.1)

But I am now the happy owner of two comfortable bras in the correct size, which is two more than I've ever had in my life. About time too!

Monday, March 18, 2013

So, I've been doing it wrong for twenty years...

Bra shopping, that is.

A recent bit of internet-browsing serendipity led to finally Doing My Research, and discovering that I, like many, have been wearing the wrong size for most of my life. At the age of 33 and as a person who sometimes sews/knits their own clothes, I feel a bit stupid. Why did it never occur me to just measure myself?

Proper bra fitting is one of those areas that mainstream shops/brands don't seem to take seriously. And it's important - additional back, neck, or shoulder pain caused by something as silly as wearing the wrong bra is something we can all do without, thanks.

My reading made me realise I've been wearing too large a band size with too small a cup size, which is apparently a really common problem. I never knew that it's supposed to be the band that holds everything up, not the straps. Therefore, the band needs to be snug (makes sense).

Also, I had no clue how cup sizes actually work: I assumed a B cup was for a certain size of breast, and a D cup was for another particular size. To my great surprise, this is totally wrong! The cup size simply corresponds to how much larger your full-bust measurement is compared to your underbust/band measurement. It's proportional, and therefore a person who wears a D cup or above might or might not look like a big-breasted person, depending on their band size. (This is all explained with proper diagrams in the links below.)

Armed with a tape measure, a willing helper, and this handy online calculator, I found that my suspicions were correct: I'm not a 16D after all. In fact, I need a 14FF, or thereabouts.

An FF cup sounds pretty gigantic, right? Well, I'm actually fairly normal-sized. Obviously I'm not small-breasted, but we're not talking super-boobs here:


Armed with all this info, and a starting-place in terms of probable correct size, I visited a couple of underwear outlet-shops yesterday.

I've always found bra shopping frustrating and waaay too time-consuming, and this expedition was no exception. I basically tried on every bra in each shop that was anywhere close to a 14FF (there really wasn't that much to choose from - most brands only go up to D in cup size), and with the help of the shop assistants, only found one bra that fit me well. Unfortunately, the cups were covered with lace - not good for me, as I live in tshirts - and the sides and straps sat too close to my armpits, which was uncomfortable when I moved my arms forward - as I would when using a computer, crafting, cooking, doing anything with my hands, really. So the search continues!

I did learn, after trying on what seemed like every bra on Smith St, that 14FF is probably my correct size, and that I need to look for bras with lower sides or with the straps placed further in from the sides (being able to move my arms freely is not an optional extra). The larger-cupped bras that I was trying on looked, to my 16D-trained eye, like things that elephants could use for parachutes - but when I tried them on, they looked just fine.
Assumptions, you are not helpful. :p 

Next, I'll try going to a specialist bra shop. First on my list is Brava, which calls itself "Australia's Premier Store for D Cup and Up". Wish me luck!

Recommended reading:
Are You Wearing the Wrong Bra?
On Sizing
Bra Fitting Basics
Fitting 101: Basic Guidelines for Your Best Fit
Does This Bra Fit? How Do I Tell?
Bra Fitting: Five Signs of a Poor Fit

Monday, February 18, 2013

Victorian knitting in colour

Confession time! When I think of nineteenth-century knitting and crochet, I picture shawls and doilies in white, black, and neutral tones. Like so:

A lacy black 'neckerchief' from Beeton's Book of Needlework, 1870.

A crocheted nightcap from The Ladies' Work-Book.

A crocheted doily from The Ladies' Work-Book.

Yup, I was fooled by the black-and-white illustrations. As it turns out, many if not most of the old patterns call for coloured yarn or thread. For example, Isabella Beeton's 'Knitted Shawl' pattern specifies "Shetland wool, white and scarlet"; and Cornelia Mee's 'Open Diamond Pattern for the Centre of a Shawl' "looks extremely well in stripes of scarlet and white".

I decided to check my new vision of colourful 19thC crafting by sampling three readily-accessible books from that time: Beeton's Book of Needlework (1870) by Isabella Beeton, Exercises in Knitting (1846) by Cornelia Mee, and My Knitting Book (1843) by Miss Lambert. (Follow the links for the full text.)

Where a colour of yarn is specified, there is a wide range of colour schemes:
  • Black, e.g. Beeton's kerchief in the first illustration above, Mee's 'Leaf Pattern for Half-Square Shawl';
  • White, e.g. Mee's 'Beautiful Pattern for a Shetland Shawl';
  • Several shades of one colour, e.g. Mee's 'Beautiful Coral Pattern' for a chair-cover in sixteen shades of scarlet, and her 'Rose-Leaf Pattern' in fifteen shades of blue;
  • Two contrasting colours, e.g. Lambert's 'Star Pattern Shawl' in claret and blue, Beeton's 'Tobacco Pouch' in black and crimson;
  • Red/scarlet/claret/rose and white, e.g. Beeton's 'Crochet Brioche Cushion' in white plus six shades of red, Lambert's 'Very Pretty Cuffs' in red and white, and her 'Warm Half-Square Shawl' in rose and white;
  • Many colours, e.g. Mee's 'German Pattern' in claret, gold, blue, white, and scarlet; and her 'Brioche Cushion' in scarlet, white, blue, gold, lilac, and green;
  • Pink for baby items, e.g. Lambert's 'Baby's Hood' and 'Baby's Sock' (the pink/blue divide is more recent).

It's a shame that these books have no colour illustrations (and not very many black and white ones). Beeton's more famous book, Beeton's Book of Household Management (1861), did have colour illustrations. I have a poster of this one on my wall, for dessert inspiration:


To see the colours people wore, we need to turn to artworks, surviving garments and accessories, and fashion illustrations from the time. Here is a hand-tinted 'fashion plate' with fabulous colourful gowns:

From Godey's Lady's Book, November 1859

(If you're interested in historical clothing, I recommend checking out The Dreamstress' blog. This edition of her regular 'Rate the dress' feature is particularly colourful: Extremely red in 1865.)

For examples of surviving Victorian knitting and crochet, a good resource is the V&A Museum's online collection - just search for 'knitting' or 'crochet'. I found this lovely little knitted purse which looks a bit like a pineapple:


In case you're wondering, many of the patterns in nineteenth-century needlework books are quite easy for modern crafters to follow. Some have errors, and others are just plain tricky, but I've successfully followed the instructions for some of the knitting-stitch patterns in the books listed above. There are some beautiful crocheted lace pattern's in Beeton's book, too. I'm going to experiment with this one:


It should help me resist the urge to make eye-searingly-colourful lacy doilies...
...Maybe.