Showing posts with label blocking. Show all posts

Monday, December 11, 2017

How to work a Provisional Cast On

A provisional cast on is a method of beginning a project using waste yarn that will be unpicked later, leaving 'live' stitches which can be loaded onto your needles for grafting. A few of my cowl patterns call for a provisional cast on: Cinnamon Stars, which is knit in the round as a long tube and then grafted, and Folia Loop and my latest Aether Cowl, which are both knit flat and then grafted.


I like the perfectly invisible graft that this technique makes possible - for me, it's well worth taking the extra trouble when casting on. My favourite provisional method is the Crochet Provisional Cast On, which involves crocheting around your knitting needle using waste yarn.

The Method:

Begin with a slip knot on the crochet hook. Hold your knitting needle behind the hook, at a right angle.

* Wrap yarn behind the needle and around the hook, then hook it through the loop already on the crochet hook. One stitch has been made on the knitting needle. Move the yarn back behind the needle, and repeat from * until all stitches are cast on.


Chain a few extra stitches and fasten off. Now you can begin working with your 'real' yarn (yay)!


When the time comes to graft both ends of your knitting together, you can easily 'unzip' the waste yarn beginning at the end with the extra crochet chain tail, transferring the live stitches to a knitting needle as you go. If you find you have one stitch too many, you can drop the final half-stitch.

If you'd like to try an alternative method, Marnie MacLean's Plenty of Provisions article in Twist Collective article has a good run-down of the various methods, complete with step-by-step photos.

Blocking Tip:

One advantage of working a cowl flat is that it gives you the option of blocking it flat before grafting. After knitting the final row of my Aether Cowl, I left the cable from my interchangeable circular needles in place, and wet-blocked it as a long rectangle:


The cast-on end, with waste yarn still in place:


After blocking, I unpicked the waste yarn, slipped the live stitches onto my needles, and grafted the ends together using Kitchener Stitch. Have you tried Kitchener Stitch for garter stitch? It actually has fewer steps to remember, since the moves for the front needle and back needle are identical. For tips, check out my follow-up tutorial: How to graft garter stitch.

If your finished graft looks a little wonky, you can 'spot-block' the graft using a spray bottle of water and stretching it out flat to match the rest of the blocked fabric. Hello, invisible graft!

Thursday, March 9, 2017

How to block textured knits

Here's the situation: you've just finished knitting something with fantastic texture, either in cables or knits-and-purls, and now you need to block it. Wet-blocking, where you soak the project before laying/pinning it out to dry, can really flatten out texture, especially if you've used a yarn that doesn't 'bounce back' much once it's dry (like an alpaca or silk blend).

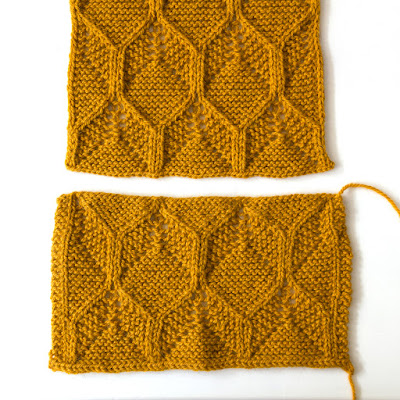
I had just this dilemma when I finished my Beeswax Scarf! I had wet-blocked my swatch and been disappointed by how flattened-out it was:

Scarf above; swatch below

Scarf on the left; swatch on the right

Obviously, I was keen to try a different blocking method that would preserve more of the lovely texture!

I settled on a method similar to wet-blocking, but with the order of the steps switched up: first you pin out your project, then you wet it. I used pins to stretch the scarf slightly and open up the eyelet-holes, and then I sprayed it liberally with a spray-bottle full of water. And I made a stop-motion video showing exactly what I did:


This method also has the advantage of taking less time to dry, because the yarn isn't fully soaked through. :)

I really want to try it next time I knit a cabled hat, because putting the hat over a balloon and spraying it has got to be easier than prodding a floppy, wet hat into shape.

Do you have a favourite blocking method I need to try?

Monday, November 21, 2016

Heartpops Revisited

Sometimes I get the urge to re-knit an older pattern and tweak a few things - the colour, the length, various aspects that don't fit my current preference. And sometimes I just really want to add a pompom! My Heartpops hat was released back in February, and I was (and am) super proud of the stitch pattern I invented of 3D hearts in a delicate cabled lattice:


What I didn't love so much, especially when it came time to photograph the hat, was the extremely bright, almost fluorescent colour I'd chosen. It's a fun colour, but it was seriously hard to photograph, especially in sunlight. I also wanted to showcase the hat's other blocking option, which is beanie-style rather than beret-style (blocked over a balloon instead of a dinner plate).

It's the same pattern, but the effect is so different:

First version (Feb 2016)

Second version (Nov 2016)

This second version is much softer and calmer looking, thanks to the change of yarn. This time I used Scout, a lofty DK-weight organic merino from Wool Days, in the colour 'Winter's Day'. The cool neutral grey shows off texture and cables beautifully! Two balls was enough for both hat and pompom.


Another tweak I made was reducing the height of the ribbing a little, because if I'm adding a pompom I want the hat to fit snugly on my head without extra room at the crown - I don't want the pompom to flop around up there. But aside from the yarn change and shortening the ribbing, the pattern is exactly the same as before.

Happily, I still had some of the heart-shaped lollipops left over from the previous photoshoot! If that's not proof of my lack of sweet tooth, I don't know what is. ;)


The updated Heartpops pattern is available on Ravelry.

Monday, October 28, 2013

A brown jersey and a yellow shawl

I finished two projects that have been hanging around for a while. Yay!

The first is a very plain, cosy brown jersey that I started back in August. I actually finished it over a week ago, but I had to wait for suitable photo-taking weather (it was over 30 degrees and putting on a jersey was unthinkable, and then it rained for a week)...


It may be plain, but I think it will be a great 'wardrobe staple'. I'm thinking of making another one with full-length sleeves, in a different colour. More photos and yarn & pattern info are on my Ravelry project page.

I also finished off a bright (very bright!) yellow shawl in a cotton/cashmere blend. It's an asymmetrical triangle shape, with a bobbled fringe. The bobbles were kind of awkward, but I was pretty fast by the end. Likewise with the short-row shaping. :)

Blocking via washing-line

I ran out of yarn - this is the bit I 'fudged'. Looks fine after blocking!

It's nice and big, and drapes really well thanks to the cotton content. Nice and easy to wear - for fans of yellow, anyway! I wore it out shopping on Saturday, and posed in a few colourful places on the way:

Blending in with the brollies

Squid! <3

Sunday, August 11, 2013

Waiting for yarn to dry...

My honeycomb cardie (Iðunn) is neeeearly finished! The sleeves are done and I've woven in the ends, but then I had to wash it before the steeking stage.
And now I have to wait for it to dry. :p

My cardie, slowly drying after its bath. Curse you, winter.

'Steeking' is the process of cutting up the centre of a jersey to turn it into a cardigan - apparently it's perfectly safe if you 'secure' the surrounding stitches first by sewing or crocheting through them. Because I'm using a fuzzy, feltable wool, crochet will do the trick.

This video tutorial by the designer Ragga shows how it's done:


A couple of before-steeking shots (it fits!):


In the meantime I've started on the next project, which will be Ysolda's Blank Canvas jersey. As per the name, it's a very plain-and-basic style of jersey which should be extremely useful. I've chosen a nice soft dark brown cashmere from Colourmart, which has (very affordable) yarn in all sorts of fibres and blends. My swatch has come out at the correct gauge, and Mum has measured the relevant bits of my torso, so I'm good to go. :)

Winding my Blank Canvas yarn...

Monday, April 16, 2012

The wonders of blocking

I finished a hat this weekend. It had been in 'time out' for a week or so, after I was forced to undo a few inches of knitting because it was painfully clear that I was going to run out of yarn. So instead of making the larger, floppier version, I backtracked and made the less-slouchy version. The pattern is Purl Beret from The Purl Bee - a great simple hat pattern for using up partial skeins of sock yarn. I used the leftover yarn from making my fingerless gloves.

I love blocking my finished projects! It tidies them up, and you can fine-tune the shape and size after trying the thing on. For this hat, I soaked it in a bowl of cool water for 20 minutes or so, carefully squeezed the water out, and got more water out by sandwiching it in a folded towel and treading on it. Then I slipped a dinner plate inside the hat, and sat the plate on top of a bowl in an out-of-the-way spot. 24 hours later, the hat was ready to wear!

Before blocking:


While blocking:


After blocking (with helpful feline):


Ta da!